


 Note: If youre looking for a specific part of the tutorial. Copy & Paste the title from the Table of Contents and hit CTRL + F to use your browsers finder feature. Also for this particular tutorial you dont have try to read everything because its a lot of stuff. Take your time with certain sections and come back when you want to learn more.
TABLE OF CONTENTS:
1. Finding & Downloading Videos
2. Free Video to JPG Converter
3. About Photoshop CS3 Extended
4. Main Menu
5. The Side Dock
6. How Photoshop Layers Work
7. Layer Styles
8. Layers of an Avatar
9. The Toolbar
10. Marquee Selections
11. Free Transform Mode
12. Importing Video Into Photoshop
13. Making Caps
14. Saving The Avatar
15. Plan Your Design
 Finding & Downloading Videos
The first part of the process is downloading the video of your choice.
Low Quality (Youtube)
http://file2hd.com/
http://keepvid.com/
These sites are online extractors. When you enter a youtube link it grabs it and gives you a link to download. Sometimes the file is named get_video and its important you rename that file to nameofvideo.flv for it to work on your computer.
 Free Video to JPG Converter
Now that you have the video, youll need some way of cutting out only the part you want and saving it as separate images for Photoshop Animation.
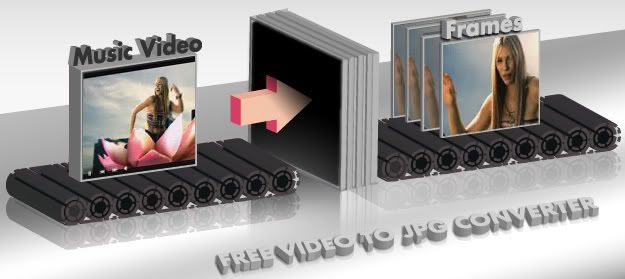
Free Video to JPG Converter is a powerful tool that allows you to take a music video of many file types and extract frames to a folder.
 Input File
 is where you will locate your video.
Output Folder is the place where you will be saving the images to. Make sure and choose a location you can remember.
Once you open the video, press play and search for a part you want to use in the avatar. When you find it, press stop and use the left and right keys on your keyboard to go back a few frames if you missed the exact point you wanted
.
Click on the Trim Left button to mark the starting point. Press play again and stop where you want it to end. This time click the Trim Right button to mark the end point.
Under the save box youre going to want to have it skip frames in the middle so you end up with a smaller file size in the end. Save Every 2 Frames.
When you hit Save it will create a folder for the video frames in the place you chose. So if you saved it in My Documents, you will find it in My Documents/Image_Frames_Folder
Download Free Video to JPG Converter Here:
http://www.dvdvideosoft.com/products...-Converter.htm
 About Photoshop CS3 Extended
The next steps require Adobe Photoshop CS3 Extended. Download the free trial http://www.adobe.com/downloads/?PID=2294914 then PM me for instructions on how to keep it after the 30 days are up.
Its impossible to learn everything about Photoshop at once and its not wise to try. For this reason, we will only cover the important features for Avatar design. If there is something I dont cover, its probably because its not important or its coming soon.
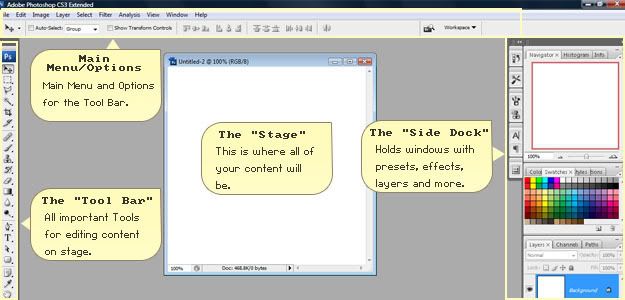
 Main Menu
This is pretty much the heart of Photoshop. Everything you could ever want to do is all here and its all nested under many different subsections. To follow an instruction such as Image > Adjustments > Curves, first click on Image, hover over Adjustments and choose Curves.

Im not going to cover the Main Menu right now because its a lot to chew on all at once but you will learn them over time as we use them to create avatars.
 Options
Right under the Main Menu we have Options which are actually a part of the Tool Bar on the right side. It changes based on what tool you have currently selected. So if I had the Text Tool selected, it would give me options to change the font size, color, font type etc.
 The Side Dock
At the right side of the Photoshop window you have a menu with many tools that help you customize your avatar or any other project. My side dock might not look like yours all the time but everyone with CS3 Extended has the same features. The sections in the side dock are called windows. So if I say Go to the layers window you should know its in the side dock.
If you dont have a window you need in the side dock you can easily bring it up by going to the main menu and clicking on Window. In there you will find many different windows for design. You can close the ones you never use and only keep the ones open that we cover in later tutorials. This way your screen remains organized and simple.
Another way the Side Dock keeps organizes windows is by using tabs. So each section may have several tabs that are related to each other. For example, by default the side dock has Color, Swatches and Styles tabbed next to each other.
Lets take a look at the most important window youll need to know about in Photoshop. The Layers Window
 How Photoshop Layers Work
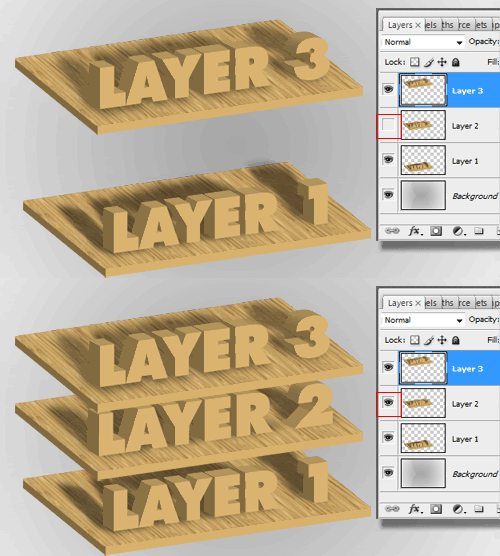
Layers are almost like the different floors of a building. On each floor you can place a different set of furniture and move it around without affecting the furniture on any other floor.
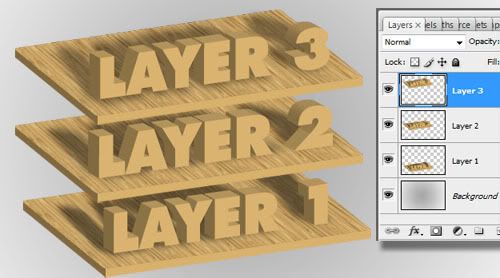
You will only be able to edit the layer that is selected. You can also select multiple layers by clicking the first one, then holding shift and clicking the second one. When you have multiple layers selected you will only be able to move them around and apply Layer Styles. If you tried to use the Paint Brush tool with two layers selected it will not work because Photoshop doesnt know exactly where you want it.
Remember when I said the furniture on different floors of a building doesnt affect each other? (Of course you did, I just said it!) Well, in Photoshop there is an option for layers to appear as if they affect each other and its called Blend Mode.
Blend Modes change the layers appearance so it looks like it blends with the layers below it. If I were to change a layer to Multiply, it would darken the colors over the layers below it.
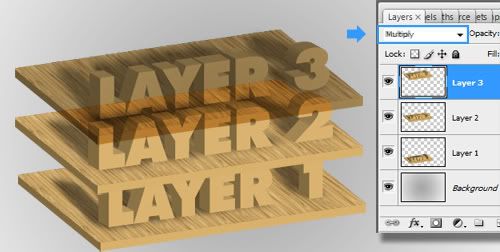
This can be changed back by choosing Normal from the drop down menu.
There are many other blend modes that do different things so play around with them until you get the effect you like.
The Eye at the left side of all layers in the layers window is a visibility setting. Clicking it will hide the contents of that layer. This is a great tool to use if you have a problem where you need to see a layer clearly but another layer is on top of it. Its also useful when you have layers you might not need anymore but you just want to keep it in case you change your mind.
At the bottom of the layers window we have a couple buttons that are very important when handling layers.
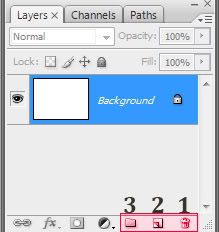
1)
Delete Layer On the right side we have the Trash Can symbol which allows you to delete layers you dont need. Just select the layer, click the trash can and in the confirmation window hit enter. You can also right click the layer and click Delete Layer or drag the layer into the Trash Can icon.
2)
New Layer When you need a new layer, click on the post-it looking icon. You will get a random title like Layer 2 if its the second layer you created. To customize the title just double click it and enter a new name.
3)
Group This is basically a folder that you can create to put layers inside of if you have too many layers. If I had 20 layers with all text, I could make a new group and name it All Type then drag all 20 type layers into the folder and close the folder so my layers window is now easier to scroll through.
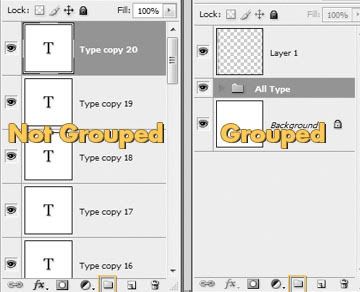
The next two are adjustments and masks which I will cover in a future lesson. Well also ignore the chain link icon because its not important. Lets take an in depth look at the fx icon which is called Layer Styles.
 Layer Styles
Layer Styles are an easy way to add some eye candy to your layers. Click the FX icon and choose an effect from the menu.

Once you do this it will open up another window with options for the effect you chose and options to add other effects.
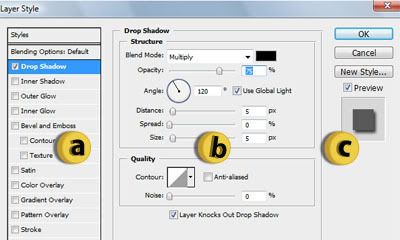 A
A This is the list of all effects you can add to your layer.
B Each effect has settings that allow you to change how the effect will look. I recommend playing around with these because it can be fun to explore.
C Here we have the OK button which lets you apply the effect to your layer, a Cancel button if you change your mind, a New Style
button which is a little confusing. Adobe should have named this Save Style because thats really what it does. When you make a style and click New Style
it asks you for a title and you can save that style for later use. Last but not least is a preview of how your effect will look. Its not always accurate but it gives a pretty good idea.
Saving Layer Styles are also useful when you need to apply the same effect to different layers. When you have created a style and saved it, go to Window > Styles and scroll to the bottom. Here you will see your newly created style and you can now select other layers and apply the effect to it. This is very useful if you want to apply an effect to several layers.
Here is an example of what each layer style looks like on default settings:
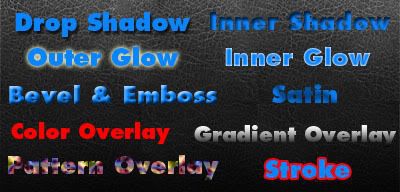
Note: The three styles with Overlay at the end will ignore the color of everything in your layer and add a new surface to it. This new surface can be a different color, a gradient and even a pattern.
Experiment with different layer styles and combine them to design your Avatar.

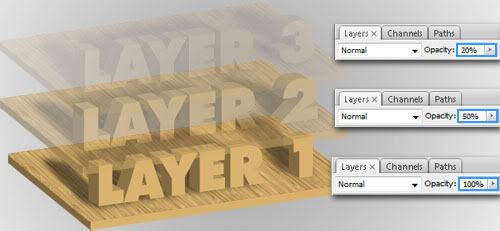
The Opacity option in the layers window is a setting that affects the transparency to everything in your layer. The higher the opacity, the less transparent it will be and the lower the opacity, the more you will be able to see layers beneath it.
 Layers of an Avatar
Now that you know what layers are about, lets take a look at the layers that make up a basic avatar:
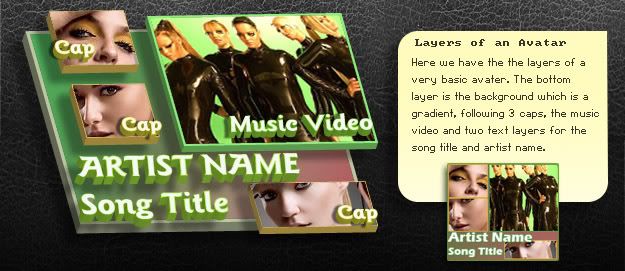 Music Video/Video Layer
 Using a technique called Image Sequence, we are able to take the frames we extracted using Free Video to JPG Converter and make a video layer in Photoshop. This layer can be resized and enhanced as well learn later on.
Cap Layers - The next three layers are screen captures from the video or from a photo shoot which are usually called Caps on ATRL. To get these in I simply opened some caps I made with Free Video to JPG Converter, dragged them into the avatar window, resized them and added some effects.
Type Layers Here the Type tool is used to create some type of the videos title and artist name.
 The Toolbar
Very often in these tutorials Ill be referring to something called The Toolbar. Photoshops Toolbar is at the left side of your window and much like a carpenters tool box, the tool bar has all of the important tools you will need to design your avatar.
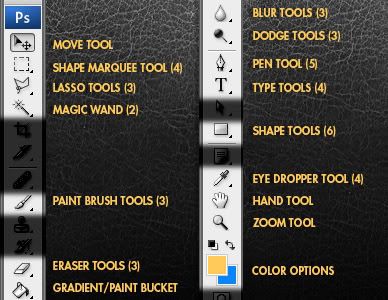
They ones I blacked out are not that important just yet, but well learn about them in future lessons. You can also hit F1 on your keyboard to activate Adobes Help window if you want to learn more about how these tools work.
When you see a small triangle on the bottom right side of a tool, it means there are different versions of the same tool under it (Called a Stack). To open a stack you will need to hold your cursor down over the tool until it highlights them. Its important to remember this because sometimes Ill ask you to get a certain tool that might be hidden under a stack.
Each tool might also have some options that appear at the top of your window. In future tutorials Ill refer to this as the options or tool options.

 Marquee Selections
You might remember these tools from MS Paint. Its sort of the same thing but with many more features. Unlike the Move tool which automatically selects everything in a layer, Marquee tools (also known as Marching Ants) let you select a specific area you want to edit and locks off the areas outside of it.
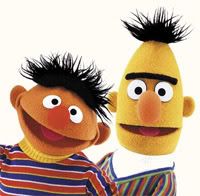
Here I have a picture of Ernie and Bert. Ernie has emailed me asking that I edit this picture for his MySpace page. He and Bert have broken up and he no longer wants him in the picture.
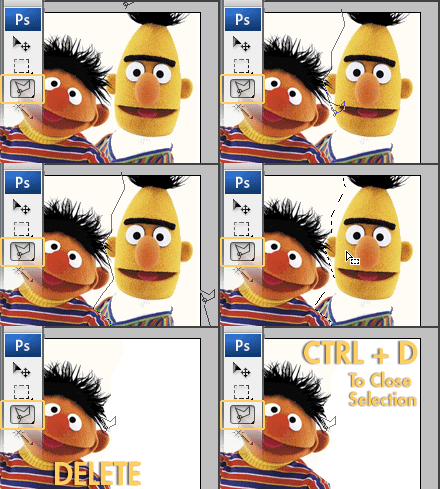
So first thing I do is select the Polygon Lasso Tool. Now I click the areas around Bert and make sure I finish drawing the selection where I started it. Once the selection is completed the marquee will flash in black and white lines that look like Marching Ants.
Now I hit Delete on my keyboard and Voila, Bert is no longer in the picture.
To get rid of the Marquee Selection either go to Select > Deselect from the main menu or hit CTRL + D on your keyboard.
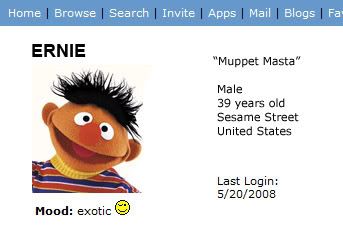
Now Ernie is happy and single.
The other selection tools in Photoshop include the Shape selection tool which allows you to draw out a circle or a square and the Magic Wand tool which allows you to click on a color in an image and select everything in the area with the same color. Its a great tool when you want to quickly cut out backgrounds from Photos.
 Free Transform Mode
Edit > Free Transform (Or CTRL + T on your keyboard) activates Transform Mode. In this mode you will be able to rotate, resize, skew and flip whatever is in the layer (Even Video Layers). When in Transform Mode, right click it to get all the options.
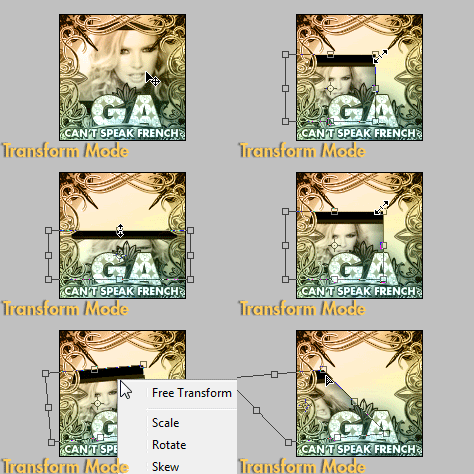
You can also constrain the proportions by holding Shift as you resize the layer. A good example of why this is important is when you need to resize a circle. If you dont resize a circle with the same proportions as it was originally, it will start to look like an oval. Hold Shift when resizing and it will remain a perfect circle.
When youre done with Transform Mode, either double click it or hit Enter on your keyboard to complete the transformation.
 Importing Video Into Photoshop
To import video into Photoshop youll need to have extracted frames in a folder somewhere. Make sure you read the Free Video To JPG Converter section before you do this step.
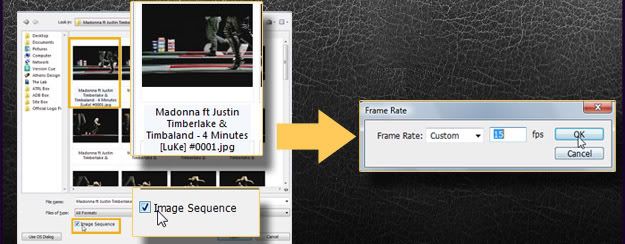
Open the first image frame and make sure Image Sequence is checked. Image Sequence looks at all the images in the folder and imports them as a full video on one layer.
Enter 10 Frames per second for YouTube video frames (or 15fps for HQ video frames) in the Frame Rate window and click ok.
If you think its playing too slowly or too fast after exporting, go to Layer > Video Layer > Interpret Footage and set the Frame Rate option to your choice.
Window > Animation opens up the Animation Timeline. Use this window if you want to preview your animation. It may not play smoothly if you have a slow computer, but once you save it to .gif later on it will play at normal speed.

Go to (Image > Image Size) and under width, type in 150px. The height should change automatically to something else depending on the original size. Click OK and when the second window pops up, click Convert.
Now go to Image > Canvas Size and change both height and width to 125px x 125px. Photoshop will let you know that Some Clipping May Occur, just click Proceed to close that window.
To keep everything organized its best to name your layers, so double click on Layer 1(The layer with the video) and rename it Music Video.
 Making Caps
Adding pictures to your avatar or Caps as ATRL calls it can be done in many ways. The most common way is using Print Screen while playing a video, pasting it to a program like Photoshop or MS Paint and saving it. Not exactly the best way to go about doing this if youre saving several caps, so lets take a look at an alternative.
Open Free Video to JPG Converter and import the video just as you would when extracting frames. Look for the part in the video that you would like to save. This time instead of pressing Save, press Make Snapshot.

Each time you click this button the program will automatically saves it to the folder you chose at the top. Just drag to a desired time frame, click Make Snapshot and repeat that process until you have the caps you need.
Now in Photoshop go to File > Open and open the caps you made. Once theyre opened, drag them into your avatar window and hit CTRL + T to resize it.

 Saving the Avatar
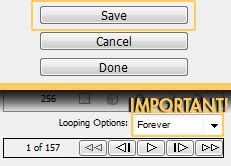
When youre done with an avatar there are two files you will be saving. First is the .psd which is the main Photoshop file you will need if you decide you need to change something. If you lose this file youre going to be looking at a long night starting over. ALWAYS save this file unless youre not that serious about the avatar. To save the .psd just go to File > Save and chose the folder.
The second is the animated .gif which you will upload and use as your avatar or give to someone else.
To save the .gif you need to go to File > Save for Web & Devices
Note: If youve made an avatar with a lot going on you might have to wait a few moments while Photoshop generates the final animation.
In this window, leave the default settings because the default will give you the best result. You can change the settings to get a smaller file size but it will cost you on the quality.
Before saving, make sure Looping Options is set to Forever instead of Once. If you leave it on Once that tells the .gif to play once and stop until you refresh the page. Forever means it will continue looping after reaching the last frame.
 Plan Your Design
Before making an avatar its best to plan your design in advance. Usually I would look at a music video and think about what kind of layout concept it will look good in and maybe even sketch out a blueprint.
If you can make a layout that matches the concept of the video it would look even better. For example, a video like Natasha Bedinfields Pocket Full of Sunshine or Danity Kanes Damaged, maybe you can do a concept that takes it literally.

 As always, I hope you were able to learn something from this tutorial. Please be sure to check out the other lessons and exercises to get the most out of your avatar.
Credits: Athens (Author) Orange/Ke (Tester)


